How to make people understand (with 5 hand-drawn examples)

Mike hears himself talk. His patient looks at him blankly.

Mike tries again. No jargon. Simple language.

The patient nods politely. But Mike can tell from the look in his eyes that he still doesn’t understand.

Argh…

How can he explain this?

Anyone who communicates about a complicated topic can sometimes get stuck. Doctors, like Mike, but also scientists, engineers, policy makers and financial experts.

Usually, we look for different words to improve our explanation.

Have you ever considered trying a wholly different approach? You can also use sketches to explain something.

Sketches are effective

Yes, drawing figures. And trees, cars and apples.

A simple, handmade sketch is often enormously effective. Because a sketch can help your audience understand your topic better, and much faster.

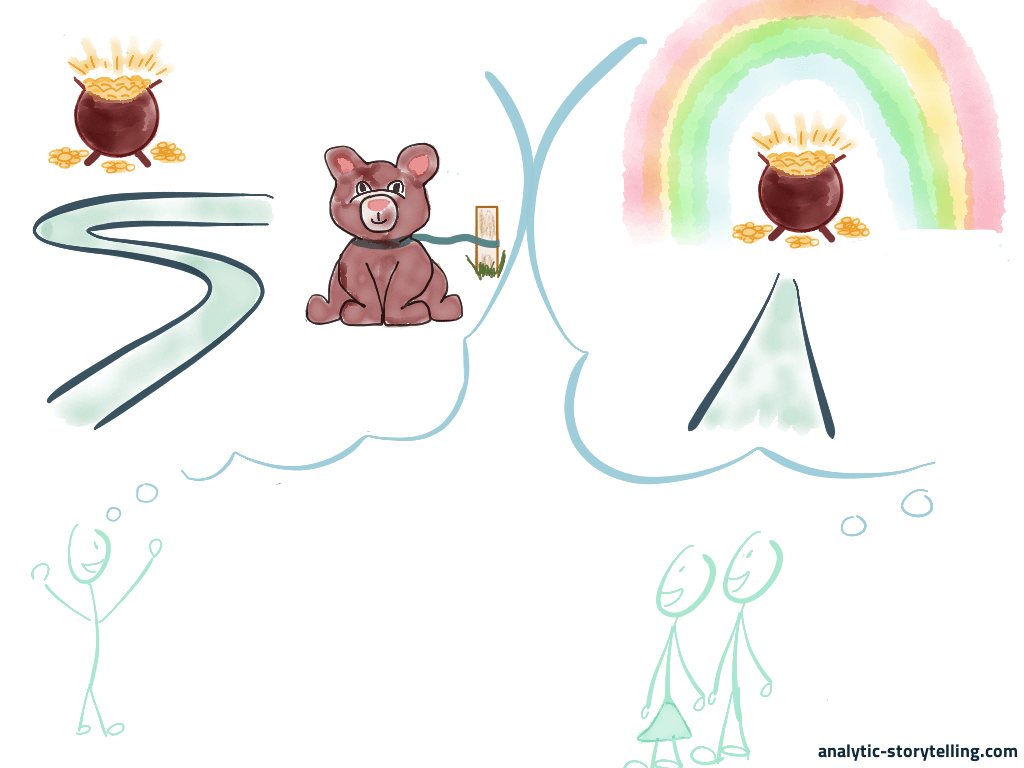
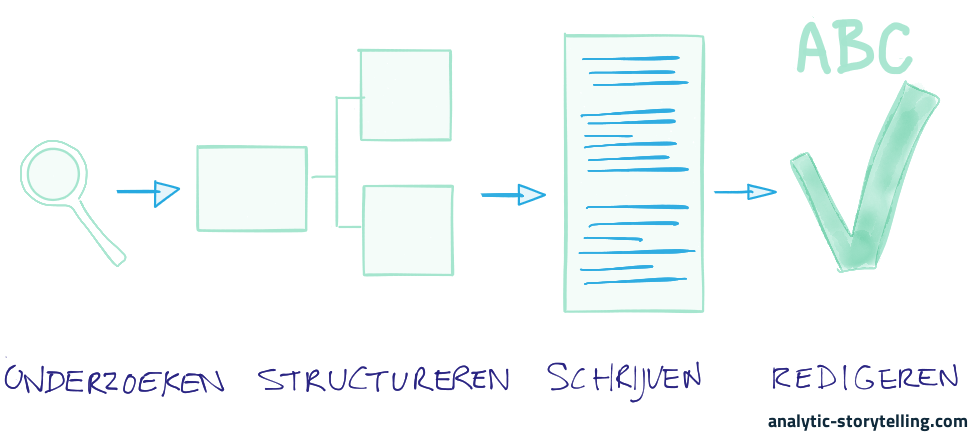
An explanatory sketch can look like this:

Most knowledge workers hardly ever draw.

Because it just doesn’t enter their minds. Because they don’t know how. Or because they think a sketch doesn’t look professional.

Drawing is generally outside of their comfort zone.

Below, I will discuss some examples of explanatory sketches. To give you an idea of how you could use such sketches yourself. And what to keep in mind when you do.

But first, a reassurance: you don’t have to be good at drawing!

Sketchplanations as example

The backpack example is from sketchplanations.com. That’s where designer Jono Hey publishes a new sketch every week, about a topic that he’s interested in.

They’re nice, visual nuggets of knowledge, easy to consume in just 30 seconds.

Often, they teach you something useful or interesting. For instance, I consistently apply the backpack trick.

As a knowledge worker, you generally communicate about topics that are more complex than backpacks. Such topics may seem more difficult to draw because they are more abstract.

Luckily, sketchplanations are often about complex, abstract topics too. I selected five of them.

#1: The 3 tallest mountains

The Mount Everest is the tallest mountain on earth. Everybody knows this. Yet there are two other mountains that also have a claim to the title.

Hey explains this as follows:

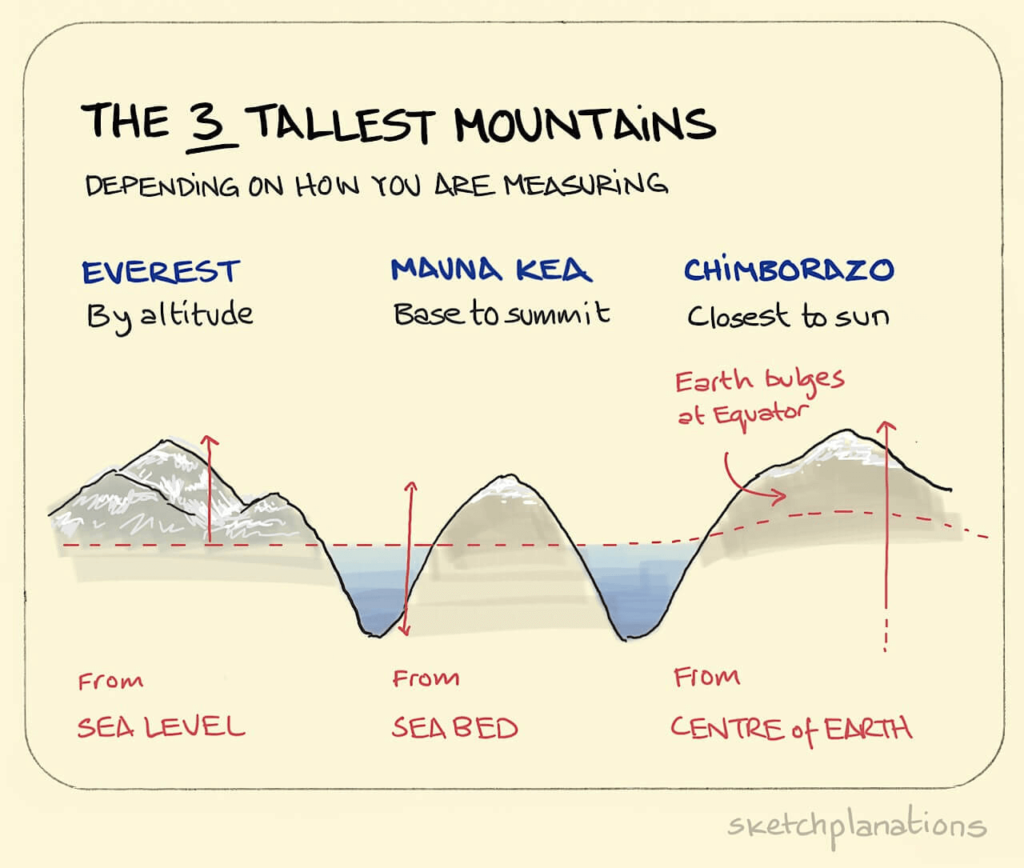
Of course, you could explain this idea using words. But an image does so more quickly.

For instance, the image helps you instantly understand the effect of the bulge at the equator.

When you sketch, you generally won’t need to draw as nicely as Jono Hey does. Hey’s mountains are pretty detailed. It takes extra time to draw like that.

A geography teacher who wants to explain this idea, would only need a few simple lines on the blackboard.

A line, a triangle, a circle, a square. With these basic shapes you can, in fact, sketch anything.

Drawing skills are therefore not that important. It is much more important that you can decide what your sketch should look like.

#2: Two-factor authentication

This sketchplanation is about two-factor authentication: a familiar concept in the world of security.

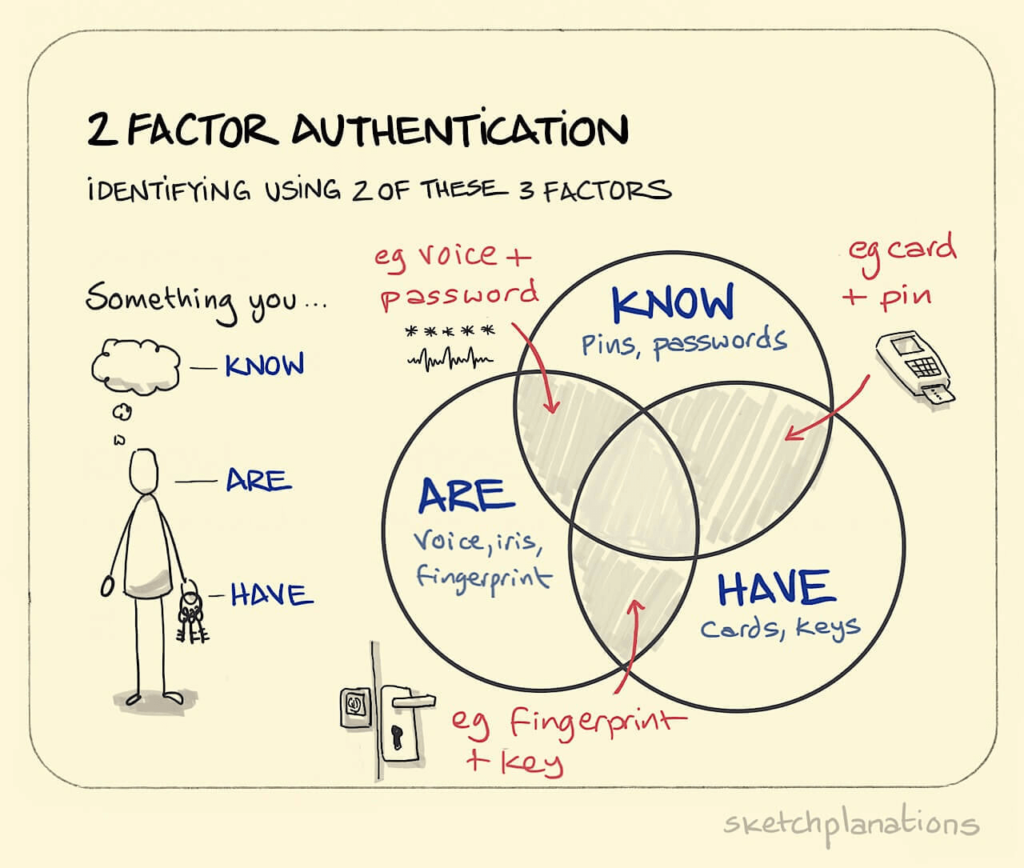
To explain the concept on an abstract level, Hey uses a Venn diagram. But he adds something.

He draws a person. And with keys and fingerprints he shows what two-factor authentication looks like in our everyday world. If he hadn’t done that, the sketch would have still been clear, but it would have remained quite abstract.

You can do the same when you sketch.

Think how people play a role in your topic. Maybe your patient, end user or customer. If you draw them, your explanation will be clearer, more urgent and more relatable.

When you sketch people, a simple stick figure often will do.

It is also good to describe people when you write or talk. But you won’t do this automatically, because when you use language, it is easy to keep it abstract. Language allows you to discuss ‘valorization’, ‘agile working’ or ‘the circular economy’ without explicitly mentioning people. When you sketch, that is less likely to happen.

#3: Accuracy and precision

The topic of this next sketchplanation – accuracy and precision – is more abstract and complex than the previous ones.

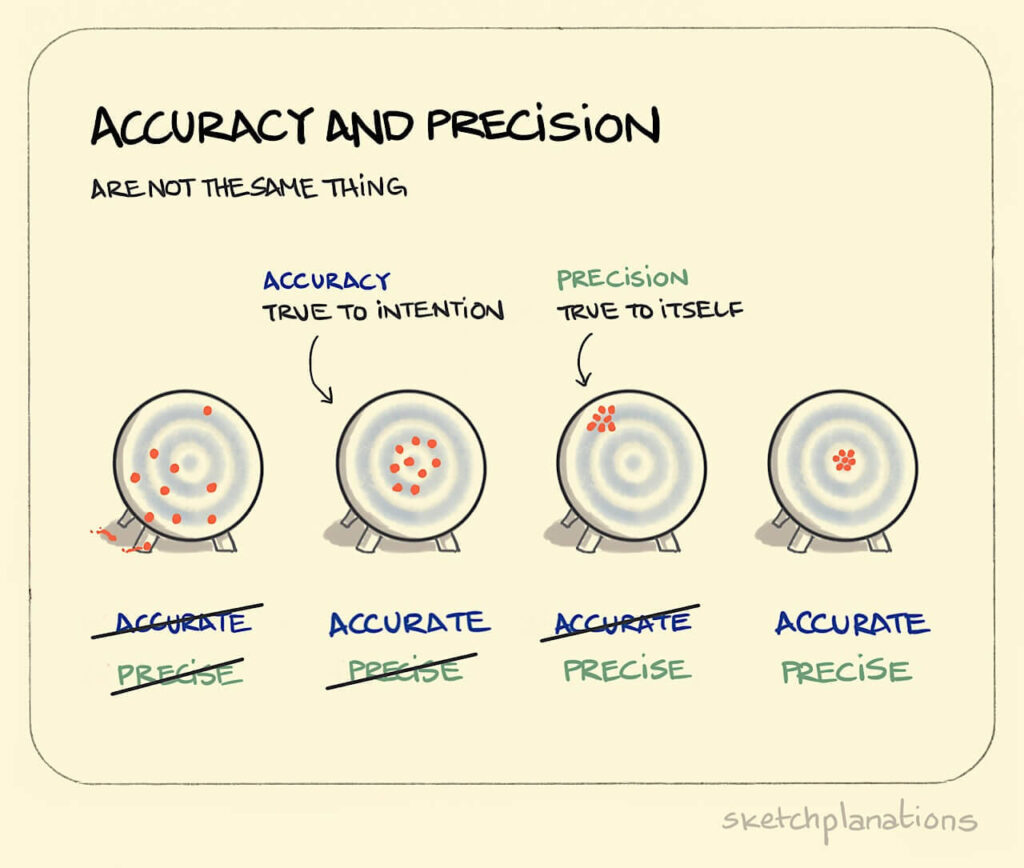
A metaphor can help to clearly explain such an abstract idea. Without the shooting target metaphor that’s not as easy.

In language, metaphors are effective too. But because metaphors often use visual language, they are usually easy to sketch, which will help your audience understand it even faster.

With a little imagination you can think of spot-on metaphors yourself. Which is often fun to do.

This sketchplanation has another important element.

Color.

Jono Hey always uses black as the base color. In addition, he uses color for the parts that are important for the explanation. Each part gets its own color.

This use of color helps your audience instantly recognize what is ‘the same’. This makes the sketch quick to understand. In addition, color makes the image more appealing. The image attracts attention.

You can use too much color. That makes the image messy and chaotic. Therefore, choose consciously what colors you use in your sketch, and use them only for things that are important for the explanation.

#4: Fruit vs vegetable

Tomatoes are fruits.

Maybe someone has told you this at some point.

As it turns out, the fruit-and-vegetable spectrum is even more complicated than that. If tomatoes are fruits, then avocado’s, cucumbers and eggplants are too.

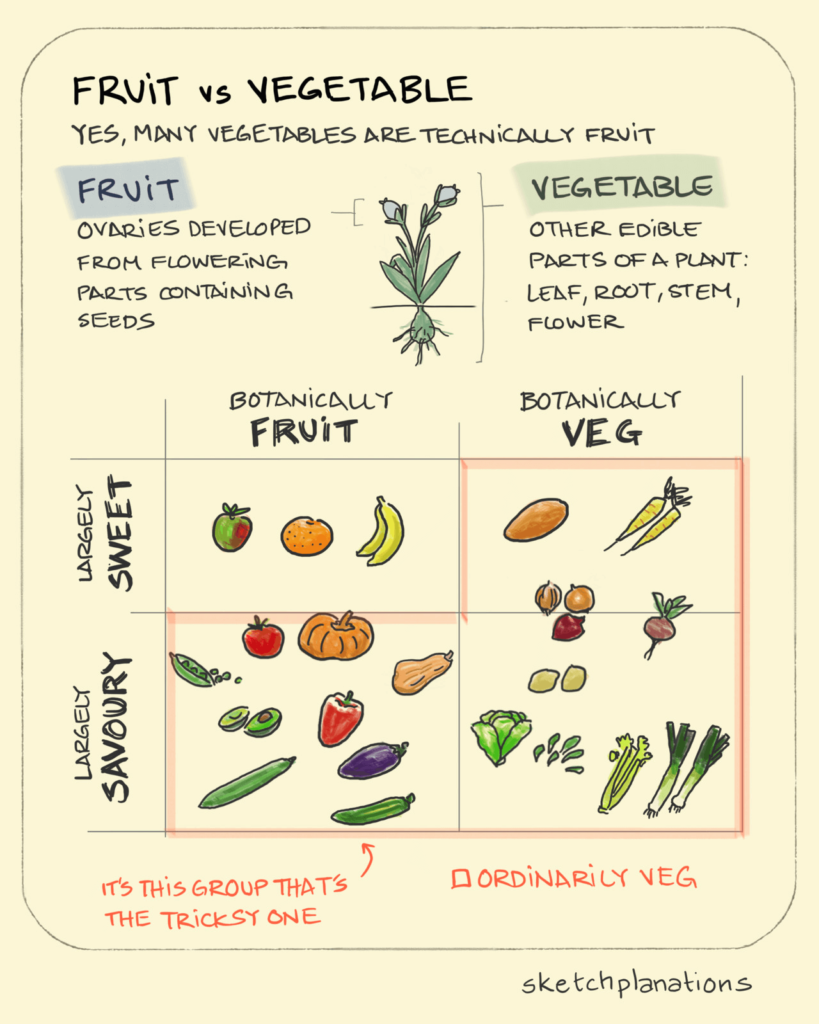
Images are useful for explaining simple contrasts. The top part of the sketchplanation is a good example of this.

Here, it’s fruit versus vegetable. The previous example contrasts precise with accurate. Similarly, contrasts like before/after, now/future and good/bad lend themselves well to sketching.

When you visually separate things (usually left/right), your audience can instantly recognize what belongs to what.

The lower part of the sketchplanation reveals another benefit of using images: you can see all the different parts at the same time.

This is a great advantage over text. With text, your audience can only experience the separate parts one after the other.

Visuals convey the connections between parts more quickly. And you don’t need to repeatedly refer to categories like ‘botanically fruit’ or ‘largely sweet’, which you would have to do when you use text.

With a sketch you can also quickly explain what parts a cell, organ, machine, organization or network is made of. And how these parts interact.

#5: The square-cube law

The square-cube law is a mathematical law. And as is often the case with mathematical concepts, it is not that easy to explain.

In this sketchplanation, Jono Hey combines two things.

On the one hand, his sketch explains the technical, mathematical part. You can compare this with the Venn diagram in the two-factor authentication image.

On the other hand, he draws familiar examples from biology and civil engineering. The elephant, the ant, the child, the tree, the building.

Examples and concrete, everyday objects are enormously helpful when you want to explain a topic in an accessible way, and bring it to life. In previous examples we saw a keyhole, an ATM, a banana and all the other fruits and vegetables.

There’s something else that’s remarkable about this sketch.

It contains quite a large amount of text.

Of course, sketches don’t always need to be self-explanatory. After all, you can usually add a verbal or written explanation.

It is important to realize that a sketch with a lot of text is often less effective and less appealing. But there certainly is no law against using text in your sketch.

To work: there are more opportunities to sketch than you think

I hope that these sketchplanations will inspire you to more often reach for a pencil yourself.

There are more opportunities to do so than you think.

I will not easily forget how my real estate agent made a drawing for me to explain that some houses in Haarlem, my hometown, are built on poles that are driven deep into the ground. And how to check whether the foundation of such a house has sunken.

The radiologist who drew the ‘diverticulum’ (a pouching in the intestinal wall) in my son’s belly scored points too. The drawing really helped me understand what was going on.

In many of our training courses, scientists and other knowledge workers make sketches about their topic. It turns out that everyone can draw. Including people who spend eight hours a day behind a computer or in a lab.

What’s more, it also turns out that every topic can be sketched.

More examples?

Do you want more inspiration? At sketchplanations.com you’ll find more explanatory sketches about various topics. You can also subscribe to the newsletter. I myself enjoy receiving a new sketchplanation in my inbox every Sunday.


Arnaud is trainer, advisor and text writer at Analytic Storytelling. He helps customers to send out a clear and convincing message in both words and images.

Breek met academische stijlconventies (als je wil dat je artikel gelezen wordt)

Een groot deel van de bachelorstudenten maakt teksten wel eens expres ingewikkelder.

Ze verwachten dat ze hierdoor slimmer overkomen.

Dat bleek uit een onderzoek onder studenten aan de Universiteit van Stanford.

Je hoort het wel vaker: als je ingewikkeld schrijft, nemen mensen je serieuzer. Klopt dat eigenlijk wel?

Spoiler: Nee.

In de wetenschap is een ingewikkelde stijl de norm

De meeste studenten proberen te schrijven ‘zoals het hoort’. Ze proberen aan de norm te voldoen. Waarschijnlijk gold dat ook voor de studenten op Stanford.

In de wetenschap Dit artikel gaat over wetenschap, maar de ideeën uit dit artikel zijn ook van toepassing op andere type teksten waarin een ingewikkelde stijl de norm is, zoals beleidsteksten.is de norm een ingewikkelde stijl. Een gemiddeld paper bevat veel lange, complexe zinnen en veel jargon.

In een natuurwetenschappelijk tijdschrift kun je bijvoorbeeld dit soort formuleringen tegenkomen:

The smallest of the URF’s (URFA6L), a 207-nucleotide (nt) reading frame overlapping out of phase the NH2-terminal portion of the adenosinetriphosphatase (ATPase) subunit 6 gene has been identified as the animal equivalent of the recently discovered yeast H+-ATPase subunit 8 gene.

Bron Dit voorbeeld komt uit het klassieke artikel ‘The Science of Scientific Writing‘ (pdf) van Gopen en Swan.


En in de geesteswetenschappen kan een zin er zo uitzien:

If, for a while, the ruse of desire is calculable for the uses of discipline soon the repetition of guilt, justification, pseudo-scientific theories, superstition, spurious authorities, and classifications can be seen as the desperate effort to “normalize” formally the disturbance of a discourse of splitting that violates the rational, enlightened claims of its enunciatory modality.

BronKijk voor de bron van dit voorbeeld hier.


Ook als het je lukt om deze zinnen te begrijpen, kost dat moeite. En beide voorbeelden zijn nog maar één zin lang.

Eerlijk is eerlijk: de laatste zin is niet helemaal representatief. Deze zin werd namelijk tweede in een Bad Writing Contest uit 1998. In deze ‘wedstrijd’ werden de slechtst geschreven academische passages is de spotlights geplaatst.

Toch geeft de zin wel een – uitvergroot – beeld van de stijl die je in academische teksten veel tegenkomt.

Natuurlijk is het niet zo dat alle wetenschappelijke teksten deze ingewikkelde stijl hebben. Maar nogmaals: zo’n stijl is wel de norm, de conventieAcademische papers schijnen met de jaren ook nog eens ingewikkelder te zijn geworden. Bijvoorbeeld het gebruik van jargon neemt toe..

Een ingewikkelde stijl vertraagt kennisdeling

De ingewikkelde wetenschappelijke schrijfstijl heeft veel nadelen. Zowel voor de schrijver als voor de lezer.

Voor de schrijver is een belangrijk nadeel dat mensen een artikel met een ingewikkelde stijl sneller wegleggen. En als ze het wel uitlezen, is de kans groot dat ze de inhoud niet goed begrijpen.

De methoden en resultaten uit zo’n artikel worden daardoor minder vaak gebruikt. Ook mist de schrijver kansen op samenwerking en constructieve feedback.

Dan de nadelen voor de lezer. Die is door de ingewikkelde stijl onnodig veel tijd kwijt met het ontcijferen van de inhoud. En soms lukt dat gewoon niet.

De academische stijlconventie vertraagt daardoor het delen van kennis.

Wetenschappers leren minder dan zou kunnen. En ze missen inzichten die voor hun eigen onderzoek relevant zijn.

Daarnaast zeggen veel wetenschappers dat papers lezen onaangenaam, frustrerend en saai is. Ook als het onderzoek zelf wél interessant is. (Meer over weten?)

Soms denken mensen dat academische teksten vooral moeilijk zijn voor buitenstaanders. Bijvoorbeeld voor leken, praktijkmensen (zoals dokters) en wetenschappers uit een ander vakgebied. Dat is niet zo: het geldt ook voor wetenschappelijke peers.

Taalkundige en psycholoog Steven Pinker verwoordt het als volgt in Why Academics Stink at Writing:

“I suffer the daily experience of being baffled by articles in my field, my subfield, even my sub-sub-subfield.”

Bron (pdf)

Wetenschappers zien een ingewikkelde stijl als vereiste

Waarom gebruiken zoveel wetenschappers dan eigenlijk een ingewikkelde stijl?

Als je hen daarnaar vraagt, hoor je verschillende redenen.

Dat het moeilijk is om helder te schrijven over een onderwerp waar je veel van weet. Dat wetenschappers een drukke agenda hebben. Dat er weinig prikkels zijn om helder te schrijven. Dat wetenschap nu eenmaal over complexe, genuanceerde zaken gaat, die je alleen in ingewikkelde, genuanceerde taal kunt vangen.

Maar in de trainingen die ik geef aan wetenschappers hoor ik één argument het vaakst: het normargument. Zo hoort het nu eenmaal in de wetenschap. Alleen als je zo schrijft word je serieus genomen. En kom je professioneel, wetenschappelijk en intelligent over.

Mensen gaan ervan uit dat een ingewikkelde stijl een vereiste is voor redacteuren van tijdschriften, voor subsidiegevers en voor supervisors: de ‘poortwachters’ van de academie.

Een andere stijl zou leiden tot kritiek, bijvoorbeeld de kritiek dat een tekst te simpel of te populair is.

De studenten op Stanford maakten hun stijl opzettelijk ingewikkelder. Later in hun carrière kiezen wetenschappers waarschijnlijk minder bewust voor een ingewikkelde stijl. De stijl is dan een tweede natuur geworden, een vanzelfsprekendheid.

Een ironisch paper verwoordt het resultaat poëtisch:

“Hell – is sitting on a hot stone reading your own scientific publications.”

Als je ingewikkeld schrijft kom je niet intelligenter over

Je komt intelligenter over als je ingewikkeld schrijft. Dat klinkt aannemelijk. Maar…

Het klopt niet.

In het onderzoek op Stanford waarmee dit artikel begon, vond Daniel M. Oppenheimer zelfs bewijs voor het tegendeel. Oppenheimer legde studenten teksten voor, waarvan sommige complexer warens gemaakt.

De studenten dachten dat schrijvers van de minst complexe teksten het intelligentst waren.

Het artikel heeft de komisch bedoelde titel Consequences of Erudite Vernacular Utilized Irrespective of Necessity: Problems with Using Long Words Needlessly.

Teksten expres ingewikkeld maken is dus niet effectief als je intelligent wil overkomen.

Ingewikkeld schrijven is geen vereiste voor publicatie

Dan de aanname dat een ingewikkelde stijl vereist is om langs de ‘poortwachters’ van de academie te komen.

Ook dat is niet waar.

Stijlgidsen van wetenschappelijke tijdschriften raden een complexe stijl meestal af.

De stijlgids van Nature vraagt auteurs onder meer om jargon en afkortingen te vermijden. Ook raadt de stijlgids aan om actief te schrijven, concepten ‘uit te pakken’ en conclusies te presenteren in zinnen met eenvoudige constructies.

Helen Sword, schrijver van het boek Stylish Academic Writing, analyseerde 100 stijlgidsen van wetenschappelijke tijdschriften. Ze keek wat die gidsen zeggen over jargon.

21 stijlgidsen raadden aan geen enkel jargon te gebruiken. 46 stelden dat je voorzichtig moet zijn met jargon. In 33 stijlgidsen stond niets over jargon.

Sword:

“I have yet to discover a single academic-style guide that advocates a freewheeling embrace of jargon. Nevertheless, academic journals are awash in the stuff.”

Bron Deze passage komt uit het artikel ‘Inoculating Against Jargonitis‘.


Nu houden niet alle redacteuren zich aan hun eigen stijlgids. Toch geven de meeste, volgens Sword, gewoon de voorkeur aan artikelen met een heldere en leesbare stijl. Met zo’n stijl kan je dus prima langs deze poortwachters komen.

Dat gebeurt ook in de praktijk.

Helen Sword analyseerde namelijk ook nog eens 500 gepubliceerde artikelen uit verschillende wetenschappelijke vakgebieden. Ze concludeerde dat in elk vakgebied ‘een gezonde minderheid’ van de artikelen goed is geschreven.

Door helder te schrijven bereik je meer lezers

De analyse van Sword toont natuurlijk ook dat je gepubliceerd kunt worden als je ingewikkeld schrijft. Ingewikkeld schrijven is nu eenmaal de norm.

Maar dat je gepubliceerd wordt betekent nog niet dat mensen je artikel ook lezen.

Een hardnekkig gerucht is dat de helft van de wetenschappelijke papers alleen gelezen wordt door referenten en redacteurs. Dat gerucht blijkt niet te bewijzen. Maar het achterliggende idee – dat veel papers een beperkt publiek hebben – wordt breed onderschreven.

Als je wil dat er iets met jouw onderzoek gebeurt, moet je dus geen genoegen nemen met een publicatie. Al zijn publicaties nog zo belangrijk voor een academische carrière. En al is gepubliceerd worden vaak ook al moeilijk.

Er gebeurt alleen iets met jouw methoden en resultaten als mensen je artikel lezen, begrijpen én onthouden. En dat bereik je door helder te schrijven.

Investeer in je schrijfvaardigheden

De meest genoemde redenen om ingewikkeld te schrijven houden dus geen stand. En er zijn goede redenen om wél helder te schrijven.

Alleen: hoe pak je dat aan?

Maak je weleens teksten expres ingewikkelder? Dan is de quick win om dit niet meer te doen. Dat is relatief makkelijk.

Actief je schrijfstijl verbeteren is moeilijker. Om een ingewikkeld onderzoek helder te verwoorden heb je goede schrijfvaardigheden nodig.

Bewustwording is al een belangrijke eerste stap. Als je beseft dat schrijfstijl veel invloed heeft, zet je het hoger op je prioriteitenlijst – ook al is je agenda als wetenschapper nog zo vol.

Vervolgens moet je structureel tijd en aandacht besteden aan je schrijfstijl. Alleen door te oefenen, word je beter, net als met een sport.

Je kunt bijvoorbeeld een schrijftraining volgenWij begeleiden regelmatig mensen die een tekst schrijven. Individueel of in een groepstraining. Wil je meer weten? Neem contact op., een boek of blog lezen over schrijven, of de schrijfstijl van artikelen bespreken met collega’s.

Helder schrijven in de wetenschap kan ook vragen om enige moed. Je breekt immers met een conventie. Toch is het goed om dat te doen bij een conventie die zo contraproductief is als deze.

Alleen zo bereik je dat anderen net zo enthousiast worden over jouw onderzoek als jij.

Online bronnen ter inspiratie

Wil je tijd investeren in je schrijfvaardigheden? De volgende links met adviezen helpen je op weg:

Algemene schrijfadviezen

Gebruik een verhalende opbouw

Vermijd onnodig jargon en moeilijke woorden

Schrijf concreet en precies

Schrijf zinnen en alinea’s met één kernboodschap

Schrijf actief, vermijd naamwoordstijl en schrijf bondig


Arnaud is trainer, adviseur en tekstschrijver bij Analytic Storytelling. Hij helpt klanten om een heldere en overtuigende boodschap op papier te krijgen in woord en beeld.

A protagonist outside the cinema (part 2 of 2): ten tips

In a previous article I discussed the benefits of using characters in content-driven communication. Characters make it easier for your audience to picture your message and put the information in a meaningful perspective. They help the reader get emotionally involved and motivated by your purpose (the ‘why’). I also gave some examples of main characters in different media and sectors.

Ready to explore how a main character can improve your story? In this follow-up article I give you ten practical tips.

Tip 1: start with the message

If you want to communicate about a complex topic, start by determining what message you want to deliver. In the first article, I discussed a commercial for Google India as an example. That commercial’s message is something like: Google’s technologies improve people’s lives by making it possible to find almost anything. Once you know that this is what you want to tell your audience, you can determine what would be the most suitable character to deliver this message.

Even if you don’t intend to use characters, it can still be helpful to think about who would be a suitable character if you did. That question can trigger other ideas that can make your story more human and more concrete.

Tip 2: choose a main character who resembles your audience

If you are not sure how to decide on a protagonist, pick one who resembles the people in your audience. This will often be a quite average and ordinary character, not someone particularly successful or special. The audience will generally think of themselves as ‘normal’ too.

Of course, it is also important to choose a character who can deliver the information. For instance, for scientific communication about an innovative and complex brain scanning method that will make it easier for doctors to do their job, a doctor is probably a better main character than a patient, albeit a less ordinary one.

Tip 3: don’t make yourself the protagonist

Generally, it is advisable to choose someone else, rather than yourself, as the main character of your story; perhaps a customer, a citizen or an employee. This is because when you-as-the-main-character are successful, or perform a good deed, it is hard to talk about this in a likable way. This is the reason why Joshua Foer, who is his own main character in the TED-talk (which I mentioned in the previous article), emphasises how surprised he was when he won a memory contest.

Introducing yourself in your own story can be effective: it allows you to describe your research or policy work in a concrete way. But this works best if your role is that of the ‘helper’ rather than the main character. In storytelling lingo, the helper shows the main character (the ‘hero’) the way, or acts as his or her mentor. Think of meerkat Timon and warthog Pumbaa in The Lion King, who teach Simba, the main character, everything he needs to know.

Tip 4: balance information and narrative

Sometimes characters deliver the main part of the message, as is the case in the Google India commercial (see the example in the previous article). In other cases, they play minor roles in the story. How you balance informative and narrative elements depends on the medium and the purpose of your story. In content-driven stories, the combination of the human aspect on the one hand with statistics and numbers on the other is often a very compelling one. You show the impact on one individual, and you also show that this impact is felt by many more people.

Using a main character in your communication doesn’t mean that it should look different from what you’re used to. A minor alteration can have a large effect. Suppose for instance that you want to explain the pedagogic policy of a child care centre. It may seem sensible to just write this down in a matter-of-fact way. But an interesting alternative would be to introduce a kindergarten teacher as a main character who tells your audience about the policy and how she implements it. Or to insert text boxes with quotes from a parent or employee.

Yusuf, one of two main characters from Google Search: Reunion

Tip 5: make your character lifelike

Will your protagonist play an important role in your story? Then make sure it is a realistic character: a person made of flesh and blood. This means that you sometimes have to include details that seem trivial from the perspective of the main message. You can also bring your characters to life by giving them a name. In the Google India commercial we meet Baldev in India and Yusuf in Pakistan. In 1947, they went to the park to fly kites every day and stole sweets together. When India and Pakistan split, Yusuf and Baldev were separated. Baldev has now grown old, and still misses Yusuf. Such an enlivened story works better than ‘Two friends found each other thanks to Google’s search engines’.

Making your characters lifelike means that you can’t exclusively emphasize their positive character traits. They have to also make mistakes, struggle with problems and have weaknesses, just like everybody else. This may feel awkward; we’d rather discuss our fantastic and innovative organisation and the high-quality products it sells. But if you want to engage your audience, this overly positive communication style is not very effective.

Tip 6: make explicit that it is just one example

A content-driven story is never about just one single person. Joined-up care is relevant to Sam, but also to Sara, Finn, Ahmed and Monica. Sam has emphysema, Type 2 diabetes and arthritis, but people with heart failure and dementia also benefit from integrated care. By using Sam as your main character, you don’t mention any other possible cases.

This is usually easy to fix by explicitly presenting your main character as an example. You can do this in the main storyline (‘Sam’s example can illustrate this’) or by describing the other possible cases in a text box (‘other diseases that these patients often suffer from are x, y and z’). Then audiences will understand that the story concerns more people than just this one individual. If it is imperative that your story covers all possible cases, it is sometimes better to not use a main character. Storytelling can be difficult to reconcile with comprehensiveness.

Tip 7: be careful with popularising (but not too careful)

Knowledge workers sometimes worry that adding a main character to their story will make it too ‘popular’, or that people will perceive it as emotionally manipulative. We feel sorry for Sam, while the main point is that projections suggest that the number of 85-year-olds will double in twenty years. We sympathise with Baldev from India and Yusuf from Pakistan, but that might make us extra sceptical about the noble intentions of a technology multinational.

If you think your audience is not receptive to a more popular message with a main character, you can put more emphasis on the main message of your story, and less on the narrative elements. In some sectors, like the care sector, describing a case is a good option. It has the same effect that a main character would have but it is perceived as less popularising.

Still, you shouldn’t be too worried about popularisations or emotional manipulation. The effect on your audience is often less strong than you think. Even a fact-focused audience often finds it easier to understand and appreciate a story than a dense document. Moreover, people often overestimate their audience’s knowledge level: even people whose work is quite similar to yours may need a little bit of popularising.

Tip 8: use your characters efficiently

It can be difficult to communicate clearly about complex topics quickly and concisely. Adding details about a character can make your story way too long. Or at least, that is an objection people sometimes have.

They are right: adding a main character generally makes stories longer. But Sam’s story (3,5 minutes) shows that a main character can be used pretty efficiently. The trick is to replace parts of the abstract, argumentative storyline by narrative elements. If you do that, you don’t have to explain much: your audience can fill in the main conclusions. When Sam calls for an ambulance, it is instantly clear that the non-integrated care system is expensive.

Tip 9: let your main character work for you

Are you working on a presentation, a poster or an animation? Choosing a main character can have a positive effect on your creative process. Your main character will automatically make your story more visual, which helps you find captivating images for abstract concepts, such as ‘innovative technologies’ – you just show Sam with his medicine dispenser.

Using a main character can also make it easier to add suspense, emotion and humour to your story. A main character gives you the opportunity to use a whole range of storytelling tricks. You can give her or him a specific goal and add obstacles, dilemmas and conflict on the road towards that goal; for instance, you can introduce a ‘villain’ who sabotages the ‘hero’. When your protagonist successfully overcomes these obstacles, your audience will experience this as a happy end.

Tip 10: experiment

Making a story with a main character requires storytelling skills. Not all knowledge workers are convinced that they themselves possess these skills. But, though it can seem a difficult task, you don’t have to be a super-creative communications expert to tell a story with a main character. In our Analytic Storytelling training I meet a lot of medical researchers who can pretty quickly prepare a nice five-minute presentation with a patient or a doctor as a main character. My advice is therefore: don’t be scared, just experiment. And if you are convinced of the benefits of using a main character, but you really struggle to come up with one, you can always ask a storytelling professional.


Arnaud is trainer, advisor and text writer at Analytic Storytelling. He helps customers to send out a clear and convincing message in both words and images.

Een hoofdpersoon buiten de filmzaal (deel 2 van 2): 10 tips

In een vorig artikel besprak ik de voordelen van een hoofdpersoon in inhoudelijke communicatie: je publiek ziet iets voor zich, raakt emotioneel betrokken en wordt gemotiveerd door het hogere doel (de ‘why’). Ook gaf ik voorbeelden van een aantal hoofdpersonen in verschillende media en sectoren. Wil je zelf nadenken over hoe een hoofdpersoon een rol kan spelen in de communicatie over jouw onderwerp? Dit follow-upartikel bevat 10 praktische tips.

Tip 1: Begin met je inhoudelijke boodschap

Bij communicatie over een complex onderwerp is het raadzaam om eerst te bedenken welke inhoudelijke boodschap je wil overbrengen. In het vorige artikel besprak ik een reclame van Google India als voorbeeld. De inhoudelijke boodschap van die reclame is iets als: De technologie van Google maakt het leven van mensen beter omdat je er bijna alles mee kunt opzoeken. Als je weet wat je wilt vertellen, kijk je vervolgens aan de hand van welke persoon je het best deze boodschap kunt overbrengen.

Ook als je geen hoofdpersoon gaat gebruiken, kan het overigens goed zijn om je af te vragen wie je hoofdpersoon zou kunnen zijn. Door die vraag kun je op ideeën komen die je verhaal menselijker en concreter maken.

Tip 2: Kies een hoofdpersoon die lijkt op je publiek

Als je twijfelt over een geschikte hoofdpersoon, is het vaak goed om iemand te kiezen die lijkt op je publiek. Dat betekent meestal dat je een gewone, alledaagse hoofdpersoon neemt, in plaats van een succesvolle of bijzondere, want het publiek voelt zich meestal ook ‘gewoon’.

Uiteraard is het wel belangrijk om een personage te kiezen met wie je ook echt je inhoudelijke boodschap kunt overbrengen. Bij een wetenschappelijk verhaal over een innovatieve, ingewikkelde hersenscanmethode die het werk van artsen makkelijker maakt, kan een arts een betere hoofdpersoon zijn dan een patiënt, ook al zijn er meer potentiële patiënten dan artsen.

Tip 3: Kies iemand anders dan jezelf als hoofdpersoon

In het algemeen is het verstandig om iemand anders dan jezelf als hoofdpersoon te nemen, bijvoorbeeld een klant, burger of medewerker. Als jijzelf als hoofdpersoon namelijk succes krijgt of goede dingen doet, is het moeilijk om daarover zelf op een sympathieke manier te vertellen. Er ontstaat dan al snel een soort Ivo Niehe-effect (‘unaniem een belachelijk groot succes’). Joshua Foer gebruikt in zijn TED-talk zichzelf als hoofdpersoon (zie het voorbeeld in het vorige artikel), maar hij legt er niet voor niets veel nadruk op dat hij heel verbaasd was toen hij de geheugenwedstrijd won.

Het kan zeker goed werken om jezelf op te voeren als personage in het verhaal: daarmee maak je jouw onderzoek of beleidswerk concreet. Dan werkt het vaak het beste om jezelf te introduceren als ‘helper’ in plaats van als hoofdpersoon. De helper is in storytellingjargon degene die de hoofdpersoon (de ‘held’) de weg wijst of als mentor fungeert. Denk bijvoorbeeld aan het stokstaartje Timon en het knobbelzwijn Pumbaa in The Lion King, die Simba alles leren wat hij moet weten.

Tip 4: Bepaal de balans tussen inhoud en verhaal

Soms zal de hoofdpersoon een groot deel van de boodschap vertellen, zoals in de reclame van Google India. Soms speelt de hoofdpersoon ook maar een kleine rol. De balans tussen de inhoudelijke boodschap en de verhalende lijn is afhankelijk van je doel en je medium. Bij communicatie over inhoudelijke onderwerpen is vaak juist de combinatie van het menselijke aspect en een onderbouwing met statistieken en getallen sterk. Je laat dan zien wat de impact is voor een individu en dat die impact op veel meer mensen betrekking heeft. (Hans Rosling is hier een meester in, bijvoorbeeld wanneer hij vertelt over bevolkingsgroei.)

Een hoofdpersoon introduceren betekent overigens niet dat heel je communicatie er anders uit moet gaan zien. Een kleine ingreep kan al veel effect hebben. Als je bijvoorbeeld in een brochure het pedagogisch beleid van een kinderopvangorganisatie wilt uitleggen, ligt het voor de hand om dat gewoon sec op te schrijven. Een interessant alternatief is om als hoofdpersoon een leidster te introduceren die vertelt wat dit beleid inhoudt en hoe ze het toepast. Een vergelijkbare kleine ingreep is om kadertekstjes toe te voegen met citaten van een ouder of medewerker.

Yusuf, één van de twee hoofdpersonen uit Google Search: Reunion

Tip 5: Wek je hoofdpersoon tot leven

Krijgt je hoofdpersoon een belangrijke rol in je verhaal? Dan moet je zorgen dat het een geloofwaardig personage wordt: iemand van vlees en bloed. Dat betekent ook dat je soms details moet invullen die vanuit de inhoudelijke boodschap triviaal lijken. Een naam helpt ook om je hoofdpersoon tot leven te wekken. In de reclame voor Google India krijg je dan bijvoorbeeld Baldev uit India en Yusuf uit Pakistan. In 1947 gingen ze elke dag samen vliegeren in het park en snoepjes stelen. Door de politieke onrust in India werden zij gescheiden. Baldev is nu oud en mist Yusuf nog steeds. Zo’n tot leven gewekt verhaal werkt beter dan ‘twee oude vrienden die elkaar dankzij de zoekfuncties van Google weer vinden.’

Je hoofdpersoon tot leven wekken betekent ook dat zij of hij niet alleen goede eigenschappen moet hebben, maar ook fouten maakt, karakterzwakten heeft en problemen krijgt. Net zoals iedereen. Mensen vinden dit soms spannend omdat ze gewend zijn te vertellen over hun geweldige, innovatieve organisatie met een kwalitatief goed product. Als je wilt dat je publiek meeleeft, is dat soort mooi-weercommunicatie alleen niet effectief.

Tip 6: Maak de status van voorbeeld expliciet

Een inhoudelijk onderwerp heeft nooit betrekking op maar één iemand. Integrale zorg is van toepassing op Sam, maar evengoed op Sara, Finn, Ahmed en Monica. Sam heeft COPD, diabetes en reuma, maar ook mensen met hartfalen en dementie hebben baat bij integrale zorg. Doordat Sam de hoofdpersoon is, noem je alle andere mogelijkheden dus niet.

Dit bezwaar is meestal goed op te lossen door je hoofdpersoon expliciet de status te geven van voorbeeld. Dat kan in de hoofdtekst (‘het voorbeeld van Sam kan dit punt illustreren’) of bijvoorbeeld in kaders die andere mogelijkheden schetsen (‘andere voorkomende ziekten zijn x, y en z’). Het publiek begrijpt dan meestal wel dat het verhaal over meer gevallen gaat dan alleen dit ene. Als het echt belangrijk is om volledig te zijn, is het soms beter om geen hoofdpersoon te gebruiken. Storytelling is niet altijd makkelijk met volledigheid te verenigen.

Tip 7: Waak voor popularisatie (maar niet te veel)

Inhoudelijk georiënteerde mensen zijn soms bang dat hun verhaal met een hoofdpersoon te populair wordt of als ‘emotionele chantage’ overkomt. We krijgen medelijden met Sam, terwijl het gaat om de prognose dat er over twintig jaar twee keer zoveel 85-jarigen zijn als nu. We leven mee met Baldev uit India en Yusuf uit Pakistan, maar dat maakt ons misschien te weinig kritisch over de intenties van een technologiemultinational.

Als je denkt dat je publiek niet openstaat voor een populairdere boodschap met een hoofdpersoon, kun je de inhoudelijke boodschap meer gewicht geven en de verhalende lijn minder. In sommige sectoren, zoals de zorg, is het ook een goede optie om een casus te gebruiken. Dat heeft dezelfde effecten als een hoofdpersoon, maar komt minder populair over.

Toch moet je ook weer niet te bang zijn voor popularisatie en emotionele chantage. Voor je publiek is dit effect namelijk vaak minder groot dan je zelf denkt. Ook een inhoudelijk publiek vindt een verhaal meestal leuker en begrijpelijker dan een taai document. Bovendien overschatten mensen bijna altijd hun publiek: ook voor mensen die in een vakgebied werken dat dicht bij het jouwe staat is al een ‘populariseringsslag’ nodig om je verhaal toegankelijk te maken.

Tip 8: Zet je hoofdpersoon efficiënt in

Bij een complex onderwerp is het vaak moeilijk om je inhoud binnen de beschikbare ruimte goed voor het voetlicht te brengen. Als je dan ook nog details over een hoofdpersoon moet toevoegen, wordt de boodschap te lang. Althans, dat bezwaar noemen mensen soms.

Het klopt dat een hoofdpersoon je verhaal meestal langer maakt. Het voorbeeld van Sam’s story (drieënhalve minuut) laat zien dat je een hoofdpersoon echter behoorlijk efficiënt kunt inzetten. De kunst is om de verhalende lijn zo veel mogelijk de abstractere, inhoudelijke lijn te laten vervangen. Dan hoef je soms ook minder uit te leggen, omdat je publiek zelf al conclusies invult. Als Sam voor een relatief kleine klacht een ambulance belt, begrijpt iedereen bijvoorbeeld meteen dat de zorg in het niet-integrale systeem duur is.

Tip 9: Zorg dat je hoofdpersoon het je makkelijker maakt

Werk je aan een presentatie, poster of animatie? Dan kan de keuze voor een hoofdpersoon ook een positief effect hebben op je maakproces. Je hoofdpersoon maakt het verhaal automatisch visueler, waardoor je minder vaak beelden hoeft te verzinnen bij iets abstracts als ‘innovatieve technologieën’. Je kunt gewoon Sam laten zien met zijn medicijndispenser.

Ook als je wilt dat je verhaal spannend, ontroerend of grappig wordt, maakt een hoofdpersoon het je makkelijker. Door je hoofdpersoon kun je namelijk een heel arsenaal aan storytellingtechnieken gaan gebruiken. Dat doe je bijvoorbeeld door haar of hem een duidelijk doel te geven en te zorgen dat er obstakels op de weg zijn, zoals dilemma’s, conflicten of een ‘schurk’ die de ‘held’ tegenwerkt. Als je hoofdpersoon die obstakels overwint, ervaart je publiek dat als een happy end.

Tip 10: Experimenteer

Een verhaal met een hoofdpersoon maken doet een beroep op je storytellingkwaliteiten. Hoewel het kan voelen als een moeilijke opgave, hoef je geen supercreatieve communicatie-expert te zijn om een verhaal met een hoofdpersoon te maken. In onze trainingen zie ik bijvoorbeeld genoeg onderzoekers die in korte tijd een leuke vijfminutenpresentatie maken met een hoofdpersoon. Mijn advies is dan ook om niet te bang te zijn en gewoon te experimenteren. Als je overtuigd bent van de voordelen van een hoofdpersoon en er echt niet uitkomt, kun je altijd nog een storytellingprofessional inhuren.


Arnaud is trainer, adviseur en tekstschrijver bij Analytic Storytelling. Hij helpt klanten om een heldere en overtuigende boodschap op papier te krijgen in woord en beeld.

A complex story? Turn on the navigation for your audience

Thought experiment: you are a committee member of a fund that gives grants to projects. How do you feel?


It is half past seven already. You’ve just been sitting on your couch, going through the last work mails. And now you’re sitting behind your dinner table. This is the only place where you could stow away that pile of proposals, as thick as a brick. Let’s see if you can do another ten tonight, before you have to pick up your daughter from her hockey training. Ten proposals; will that make two or three grants?


One funding officer whom I worked with aptly summarized this situation: during the first look at your proposal, a reviewer is searching for reasons not to approve it. This can be a conscious effort, but also something he’s unaware of. The time pressure and the low average success rates are always in the back of his mind.

During that first impression, the extent to which your text is accessible makes all the difference. Even before any of its content is up for review. Take a look at this example, of which I deliberately made the content unreadable:

The text on the left has a clear layout and is navigable. You do not yet know what it will tell you, but you trust that you’ll learn that in a minute. You feel like starting the engine.

On the right the engine goes off immediately. What part should I focus on? You expect to get lost and end up driving in useless circles.

Short and well structured paragraphs are one of the ingredients of a navigable text. Parker Derrington explains this very well in one of his blogs:

  • “Most of the people scoring your grant will speed-read your case for support. Speed-readers read the first line of every paragraph provided there is white space between them. The longer your paragraphs, the less you communicate with speed readers.
  • Long paragraphs are usually very hard to digest. They are usually a sign that what you are writing is either very complex, or just a bit disorganised. The few readers who really want to read the detail in your case for support will find it hard.”

The structure of such a paragraph is always the same:

  1. Start with the main message of your paragraph. The most important point, the conclusion, the core; however you want to call it.
  2. Collect the arguments, examples, explanations that belong to that main message.
  3. Put those in your paragraph and connect them to the main message with signaling words (‘because’, ‘for example, ‘first’).
  4. Start a new paragraph as soon as you reached the following main message.

So next time, first put yourself in the shoes of your audience, who will journey through your proposal, and turn on the navigation for them. They will be grateful for it. And that is precisely what you want from someone who is to decide on your fate.


Stijn is director, trainer and advisor at Analytic Storytelling. We help people to make content-driven stories. That is: clear and compelling communication on complex content.

Convince your audience: argue against your own proposal

Question 1: Your colleague enters your office and proposes to switch the whole company from offline Microsoft Office to online Google Docs. What is your first reaction: yes or no?

Question 2: You walk into the office of your colleague and propose to switch the company from offline Microsoft Office to online Google Docs. Which arguments would you bring to convince him?

Big chance that you answered question 1 with “no”. You automatically thought of reasons not to do it: we would probably loose documents during the transition. Or, Google Docs does not have that handy review mode that I always use. In case the internet is out, we won’t be able to work for a whole day.

As for question 2, big chance that you thought of many positive arguments: You can work together with colleagues in the same document at the same time, which saves everyone endless email exchanges. You don’t have to install anything, it works immediately. You can access your documents at all times, also with your smartphone.

That’s weird, isn’t it, this difference?

You automatically think of your plan’s positive aspects, but forget about the hurdles

This effect is particularly relevant in the case of complex business plans, policy proposals, or grant applications. You want to change something or do something innovative and you only think of the positive aspects of your project. You work these out in your proposal, well-argued and precisely formulated.

It is frustrating, then, when you get feedback or a rejection because you forgot to remove the negative barriers for your audience. Your chance is gone of gaining funding, permission or commitment. And maybe that chance is never coming back.

How is this possible?

People are risk averse and this often turns up with proposals for change

Psychologists call this risk aversion. People want to minimize the possibility that something goes wrong. Hence unconsciously and automatically they start searching for objections against a proposed change. Accordingly, you have to consider that your audience might also look at your plan from this perspective. This does not mean, by the way, that this is the only perspective they might take. Without positive arguments and benefits your plan would not even be interesting. But you usually mention these already more easily.

The risk aversion of your audience is triggered either more or less, depending in the situation. So think about this as you are working on your proposal. These are the circumstances in which risk aversion plays a bigger role:

  • The change that you propose is fierce compared to the status quo. For example, you want to switch in one month from offline Microsoft Office to online Google Docs. This pace will trigger your audience.
  • The change that you propose might have big and direct consequences for your audience. For example, the manager has turned your topic into a personal ambition. Hence he will be made responsible if something goes wrong.
  • There are many alternatives for your proposal. This plays an important role in, for example, grant proposals. Here, success rates are often only about 20%. In other words, reviewers know that they should reject 80%. If your proposal carries a clear risk, it will be tempting for the reviewer to put it on the pile of rejections.

Action plan: argue in favor of and against your proposal to make it stronger

Is the risk aversion of your audience depressing you? That’s not necessary. You can use it in a positive way to make your ideas more powerful and convincing.

First you do what you always do: you work out your proposal and its strengths. Take the perspective of your audience to do this. What are the most important reasons for them to accept your proposal? Once you did this, also take the risk aversion of your audience into account by following these two extra steps.

Step 1: Formulate the possible objections

A quick, nice and insightful way to do this is the pre-mortem session. Imagine that your proposal has been accepted, but that the result turned out to be a nightmare. You look back on the project and you wonder: what went wrong? Identify as much of the possible reasons, and as concrete as possible, for the failure of your project. These are the objections that a risk averse audience might have. In case of minor topics, you can easily do this on your own. If it concerns a big and important proposal, you can do the pre-mortem with a group. Preferably, your intended audience joins the session. Or someone who knows them well, like the secretary to the board that you want to convince. This way you would get a wide range of possible objections, formulated from the perspective of your audience. Big chance that issues turn up which you never thought of before.

Imagine that you do this for the exemplary proposal to switch the company from offline Microsoft Office to online Google Docs. Three possible objections already came up: documents can get lost during the transition, Google Docs does not have all features used in the company, and you won’t be able to access your documents in case the internet is out. In a pre-mortem session you’ll surely find more objections, such as:


  • Customers turn away because they don’t want to have their confidential documents located in an online environment.
  • Employees who have a hard time working with Google Docs will keep on buying Microsoft Office licenses through their department, meaning you won’t save any costs after all.
  • The ICT department cannot handle the peak in questions coming in after the transition, because there are too few people on the helpdesk. This way projects won’t be finished in time.


It is striking that possible objections to a proposal often concern very practical issues. This is logical. Over the past years the status quo has turned itself into a situation that works in practice. Your new proposal is not there yet. Accordingly, even if it looks promising in general, you also have to show that it does not cause practical problems in the short term.

Step 2: Formulate solutions to the objections and share them with your audience

The first step yielded a wide range of possible objections. In step 2 you turn these into positive support for your proposal:

First you check for each objection whether you took it into account when you came up with your proposal. If not, you can probably improve your plan by thinking of a solution for that particular objection.

Next, when you found a solution for that objection, you include this in the positive argumentation of your proposal. This way you show your audience that you took their possible concerns into consideration. Your audience then feels understood and this creates a basis of trust in you and your proposal.

In the example of switching from Microsoft Office to Google Docs, this works as follows:


  • Objection 1: Documents can get lost during the transition
  • Solution 1: Before the transition we make a complete back-up with an index of all documents. Then we transfer everything to Google Docs, but we keep Microsoft Office as a parallel system. Only once we’ve used the index to verify that everything has been transferred successfully, we start using Google Docs.
  • Objection 2: The ICT department cannot handle the peak in questions coming in after the transition, because there are too few people on the helpdesk.
  • Solution 2: Five extra helpdesk-employees will be mobilized from three months before until nine months after the transition. They will only deal with questions concerning the transition from Microsoft Office to Google Docs.


To conclude: arguing against your own proposal can be fun and will only make it stronger

Next time that you prepare a proposal, take a look through the eyes of your audience and consider: are there any reasons not to want this? In a pre-mortem session you’ll find out in a quick and nice manner. This way you’ll strengthen your proposal and you’ll be able to present it convincingly, no matter how risk averse your audience is.


Stijn is director, trainer and advisor at Analytic Storytelling. We help people to make content-driven stories. That is: clear and compelling communication on complex content.

Make a structure before you start writing: 3 advantages of a bullet list

Writing is hard, frustrating, and it costs a lot of time. You’re trying hard, but you just can’t seem to get a coherent text on paper. And still, you know more than enough about your subject. Sounds familiar? By first making a bullet list, you can improve your writing process and your result.

How do you start writing? Most people wait till the deadline is due before sitting at their computer. They type a first sentence, then another one, and one more. And at a certain point they get stuck. In fact, it is kind of weird to start this way. When building a house, one would always start with a design before placing a first brick. First you think, then the action follows. A bullet list can help you to work on your text in similar fashion.

To write based on a bullet list has three major benefits.

  1. It provides a structure that your audience can follow
  2. It helps combining content with storytelling elements
  3. It improves your writing process

Benefit 1: A bullet list provides a structure that your audience can follow

You set up your bullet list once you have collected all relevant information, for example by reading, brainstorming, researching, et cetera. Roughly, your writing process then contains four phases:

By making a bullet list, you reserve a moment for structuring your story. This makes it easier to improve your structure. If you start writing on the spot, this becomes more difficult, because then you write and structure at the same time.

The structure provided by your bullet list will later help your audience when reading your text. If a clear structure is absent, your readers won’t find their way through your story. They have to work hard, will drop out, or will misunderstand your message. The more complex your topic is, the more important a clear structure becomes. Scientific research also shows that readers find texts better and more coherent when they are based on a written outline prepared during prewriting.

Let’s take a policy story as example, in which you want to convince the board of your hospital to open a ‘boulevard of healthcare’. The bullet list describing the reasons for your proposal might look as follows:


  • A growing number of our hospital beds are left empty.
    • Complex care increasingly takes place at home.
    • In case of specialist treatments, patients more often choose a specialized hospital than a small hospital like ours.
  • It is expected that in 2020, 25% of our hospital beds will be systematically unoccupied.
    • This is a national trend.
    • This expectation is based on figures of research agencies specialized in healthcare data.
  • The costs of our building remain the same, hence we are running into financial problems.
    • Calculations show a shortage of € 0,4 million in 2020.
    • Over the last months, the relocation of complex care from hospital to home has been faster than expected. So maybe the calculations are even too optimistic.

Compared to paragraphs full of text, it’s easy to keep track of the main structure and set all details aside. Adding, moving or removing content is simple. Psychologically, it is easier to omit an idea, even if you are attached to it (‘kill your darlings’), if it is represented in a bullet rather than a paragraph. For example, is it really relevant in our case that this concerns a national trend?

Or consider the sub-bullet about the expected shortage. You might turn this into the first main bullet and see what this means for the storyline. It is much more difficult to consider such different orders or regrouping of details if you already have your text.

One extra benefit of a bullet list is that you can discuss your storyline in an early stage. I do this myself, for example with clients in storytelling sessions, with participants in trainings, and with colleagues when writing blog articles like this one.

Benefit 2: A bullet list helps combining content with storytelling elements

When writing on complex topics, your text quickly becomes abstract. The text on the healthcare boulevard, for example, would go on about such things as healthcare substitutes average length of stay, primary care, business cases or stakeholders. In these cases, to make your text more appealing and easier to understand, you should add examples.

If you know all about your subject, you often have many examples at hand, and they all seem relevant. How do you integrate these in your text without making it chaotic? Again, the bullet list can help.

Take the exemplary bullet list on the healthcare boulevard. Here, the sub-bullets all support the main bullets. In these sub-bullets, besides giving arguments, you can also give examples that clarify the main bullet. Further on in the policy story, this looks as follows:


  • The boulevard of healthcare improves the connections between healthcare providers, causing the quality of care to increase.
    • [example] A patient visits her doctor with speech impediments. The doctor concludes that it’s a stroke and sends her to the emergency department. To prevent brain damage, she has to be there as quickly as possible. If the doctor’s office would be located on the boulevard, she would be there in two minutes.

When you place an example under a main bullet, you are certain that it fits in your argumentative structure. Hence a bullet list makes it easier to decide which examples to include in your text and where to place them.

Benefit 3: A bullet list improves your writing process

Writing is hard especially because writers tend to do too many things at the same time. In practice, the writing process often looks like this:

If you do your structuring, writing and editing all at once, you give yourself a heavy cognitive load. As a result, you get stuck, or you fall into task avoidance. For example, you find yourself making literature references, while you intended to structure your text.

You work better when you do one thing at a time. Psychologically, any (writing)project is less heavy when it consists of distinct subprojects, structuring being one of them. This is why some argue that making an outline can help you eliminate writer’s block. After the research phase, making a bullet list is an easy task to begin with. And once you have a good bullet list, it becomes clear how to proceed with the actual writing. After all, you have already done a lot of preparatory work. You know what you want to say, you have a sound structure, so you can focus all your energy on your text. This way, you might even get the feeling that the text is writing itself.

The pomodoro technique is a practical technique to make sure that you only do one thing at a time. You set a timer to 25 minutes and decide beforehand what you want to do, for example, building a structure with a bullet list. When the alarm goes off, you take a short break. Then you choose whether to continue working on your structure, or whether it is time to start writing.

Accordingly, a bullet list helps you to write easier and faster. You will earn back every minute that you invest in a bullet list with interest. A writer who argues that he couldn’t make a bullet list because of a deadline, is making a paradoxical claim: I have no time to write efficiently. That’s like a lumberjack who’s too busy to grind his ax.


Arnaud is trainer, advisor and text writer at Analytic Storytelling. He helps customers to send out a clear and convincing message in both words and images.

Complex verhaal? Schakel de navigatie in voor je publiek

Gedachte-experiment: je bent commissielid bij een fonds dat subsidies uitdeelt. Hoe zit je erbij?


Het is al weer half acht. Je hebt op de bank nog even de laatste e-mails van je werk weggewerkt. Je gaat aan de eettafel zitten. Alleen daar kan je de vuistdikke stapels aanvragen kwijt. Eens kijken of je er vanavond nog tien kan doornemen voor je je dochter van hockey moet halen. Tien aanvragen; zullen dat twee of drie toekenningen worden?


Een subsidie-adviseuse waar ik mee werk, vatte deze situatie treffend samen: een beoordelaar is bij zijn eerste blik op je aanvraag op zoek naar redenen om niet te honoreren. Dit kan bewust zijn, maar vaak ook onbewust. De tijdsdruk en de lage gemiddelde slagingskans zitten altijd in zijn achterhoofd.

Bij die eerste indruk speelt een enorme rol hoe toegankelijk je tekst is. Nog voordat de inhoud aan bod komt. Kijk maar naar dit voorbeeld, dat ik bewust inhoudelijk onleesbaar heb gemaakt:

De tekst links is overzichtelijk en navigeerbaar. Je kent je inhoudelijke bestemming nog niet, maar je hebt er vertrouwen in dat je hem gaat vinden. En je hebt zin om de motor te starten.

Op rechts slaat mijn motortje gelijk af. Waar moet ik naartoe? Dat wordt een hoop verdwalen en nutteloze rondjes rijden.

Korte, goed gestructureerde alinea’s zijn één van de ingrediënten van een navigeerbare tekst. Parker Derrington legt dit erg goed uit in een van zijn blogs:

  • “Most of the people scoring your grant will speed-read your case for support. Speed-readers read the first line of every paragraph provided there is white space between them. The longer your paragraphs, the less you communicate with speed readers.
  • Long paragraphs are usually very hard to digest. They are usually a sign that what you are writing is either very complex, or just a bit disorganised. The few readers who really want to read the detail in your case for support will find it hard.”

De opbouw van zo’n alinea is telkens hetzelfde:

  1. Begin met de hoofdboodschap van je alinea. Het allerbelangrijkste, de conclusie, de kern; hoe je het noemen wil.
  2. Verzamel de argumenten, voorbeelden, toelichting die bij die hoofdboodschap horen.
  3. Zet die in de alinea en verbind ze met signaalwoorden (‘want’, ‘bijvoorbeeld’, ‘ten eerste’) aan de hoofdboodschap.
  4. Begin aan een nieuwe alinea wanneer je de volgende hoofdboodschap bereikt hebt.

Dus verplaats je de volgende keer in je publiek dat de reis door je aanvraag gaat maken en schakel de navigatie voor ze aan. Ze zullen je dankbaar zijn. En dat is precies wat je wil van iemand die over je lot beslist.


Stijn is directeur, adviseur en trainer van Analytic Storytelling. We helpen mensen om inhoudsgedreven verhalen te maken. Dat betekent: heldere en overtuigende communicatie over complexe inhoud.

Overtuig je publiek: argumenteer tegen je voorstel

Vraag 1: Je collega komt je kantoor binnen en stelt voor om het hele bedrijf over te laten stappen van offline Microsoft Office naar online Google Docs. Wat is het eerste dat je denkt: ja of nee?

Vraag 2: Je loopt het kantoor van je collega binnen en stelt voor om het hele bedrijf over te laten stappen van offline Microsoft Office naar online Google Docs. Welke argumenten heb je bedacht om hem te overtuigen?

Grote kans dat je op vraag 1 met “nee” hebt geantwoord. Je dacht automatisch aan redenen om het niet te doen: we raken vast documenten kwijt tijdens de overstap. Google Docs heeft niet die handige review-functie die ik altijd gebruik. Als het internet een keer uitvalt, kunnen we de hele dag niet werken.

Grote kans dat je bij vraag 2 allerlei positieve argumenten hebt verzonnen: je kunt documenten met meer mensen tegelijk bewerken, dat scheelt oeverloze mailtjes. Je hoeft niks te installeren, het werkt direct. Je kunt overal bij je bestanden, ook met je telefoon.

Gek toch, dat verschil?

Je denkt automatisch aan de positieve kanten van je plan, maar vergeet de barrières

Dit effect zie je vaak bij complexe bedrijfsplannen, beleidsvoorstellen, of subsidie-aanvragen. Je wilt iets veranderen of iets nieuws doen en denkt daarbij alleen aan de positieve elementen van je project. Je schrijft die goed beargumenteerd en strak geformuleerd op in je voorstel.

Frustrerend als je dan feedback of een afwijzing krijgt omdat je vergeten bent de negatieve barrières voor je publiek weg te nemen. Weg is je kans om nu financiering, toestemming of commitment te krijgen. En misschien komt die kans wel niet meer terug.

Hoe kan dat?

Mensen zijn risico-avers en dat komt bij een voorstel tot verandering vaak naar boven

Psychologen noemen dit risico-aversie. Mensen willen de mogelijkheid dat iets fout gaat zo klein mogelijk houden. Dus gaan ze onbewust en automatisch op zoek naar bezwaren tegen een voorgestelde verandering. Je moet er dus rekening mee houden dat jouw publiek ook met dat perspectief naar je plan kijkt. Dit betekent overigens niet dat dit het enige perspectief is. Zonder positieve argumenten en voordelen is je plan überhaupt niet interessant. Maar die benoem je meestal veel makkelijker vanzelf.

De risico-aversie van je publiek wordt meer of minder getriggerd afhankelijk van de situatie. Dus denk hier bewust over na terwijl je je voorstel maakt. In deze omstandigheden speelt risico-aversie een grotere rol:

  • De verandering die je voorstelt is heftig vergeleken met de status quo. Je wil bijvoorbeeld in één maand volledig overstappen van offline Microsoft Office naar online Google Docs. Die snelheid zal je publiek triggeren.
  • De verandering die je voorstelt heeft mogelijk grote en directe gevolgen voor je publiek. Bijvoorbeeld: de bestuurder heeft jouw onderwerp tot een persoonlijk speerpunt gemaakt. Hij zal er dus op aangekeken worden als er iets misgaat.
  • Er zijn veel alternatieven voor je voorstel. Dit speelt bijvoorbeeld een belangrijke rol bij subsidie-aanvragen. De slaginspercentages hierbij zijn vaak maar ongeveer 20%. De beoordelaars weten dus dat ze 80% moeten afwijzen. Als jouw voorstel een duidelijk risico heeft, wordt het voor de beoordelaar verleidelijk het in het bakje “nee” te schuiven.

Stappenplan: argumenteer voor én tegen je voorstel om het sterker te maken

Word je een beetje somber van de mogelijke risico-aversie van je publiek? Dat hoeft niet. Je kunt hem op een positieve manier inzetten om je idee extra krachtig en overtuigend te maken.

Eerst doe je wat je altijd doet: je formuleert je voorstel en zijn sterke punten. Doe dit vanuit het perspectief van je publiek. Wat zijn voor hen de belangrijkste redenen om het voorstel aan te nemen? Als je dat gedaan hebt, volg je deze twee extra stappen om rekening te houden met de risico-aversie van je publiek.

Stap 1: Formuleer ook de mogelijke tegenwerpingen

Een snelle, leuke en inzichtelijke manier om dit te doen is de pre-mortem-sessie. Stel je voor dat het voorstel is aangenomen, maar het resultaat is een ramp geworden. Je kijkt terug op het project en denkt: wat is er misgegaan? Benoem zo veel mogelijk en zo concreet mogelijke oorzaken voor het falen van het project. Dat zijn de mogelijke tegenwerpingen van een risico-avers publiek. Bij kleine onderwerpen kun je dat snel in je eentje doen. Bij een groot belangrijk voorstel doe je de pre-mortem-sessie met een groep. Het liefst met je beoogde publiek erbij. Of iemand die hen goed kent, zoals de secretaris van het bestuur dat je wil overtuigen. Dan krijg je namelijk een breed scala aan mogelijke tegenwerpingen, geformuleerd vanuit het perspectief van je publiek. Waarschijnlijk zitten er dingen tussen waar je zelf nooit aan gedacht had.

Stel je doet dit voor het voorbeeld-voorstel om met je hele bedrijf van offline Microsoft Office naar online Google Docs over te stappen. Drie mogelijke tegenwerpingen kwamen daar al direct naar boven: documenten kunnen kwijt raken tijdens de overstap, Google Docs heeft niet alle functies die in het bedrijf gebruikt worden, en als je geen internetverbinding hebt, kom je niet bij je bestanden. Maar uit een pre-mortem-sessie vind je er vast nog meer, bijvoorbeeld:


  • Klanten trekken zich terug omdat ze niet willen dat hun vertrouwelijke documenten in een online omgeving staan.
  • Medewerkers die niet overweg kunnen met Google Docs blijven via hun afdeling gewoon Microsoft Office-licenties kopen, waardoor je alsnog geen kosten bespaart.
  • De ICT-afdeling kan de piek in vragen net na de overstap niet aan omdat er te weinig mensen zijn op de helpdesk. Hierdoor komen projecten niet op tijd af.


Wat opvalt is dat mogelijke tegenwerpingen op een voorstel vaak heel praktische zaken zijn. Dat is ook wel logisch. De status quo heeft zich over de afgelopen jaren gevormd tot een werkbare praktijksituatie. Jouw nieuwe voorstel heeft dat niet. Dus ook al ziet het er in grote lijnen gunstig uit, je moet ook laten zien dat het in praktijk op korte termijn geen problemen oplevert.

Stap 2: Formuleer een oplossing voor de tegenwerpingen en vertel die aan je publiek

Uit de eerste stap heb je een heel scala aan mogelijk tegenwerpingen overgehouden. In stap 2 ga je die omzetten in positieve ondersteuning voor je voorstel:

Eerst kijk je voor elke tegenwerping of je daar bij het bedenken van je voorstel rekening mee hebt gehouden. Zo niet, dan kun je waarschijnlijk je voorstel verbeteren door een oplossing voor die tegenwerping te bedenken.

Vervolgens, wanneer je een oplossing voor de tegenwerping hebt gevonden, voeg je deze toe aan de positieve argumentatie voor je voorstel. Zo laat je je publiek zien dat je rekening hebt gehouden met hun mogelijke bedenkingen. Je publiek voelt zich begrepen en dat schept veel vertrouwen in jou en je voorstel.

Voor het voorbeeld over overstappen van Microsof Office naar Google Docs werkt dat bijvoorbeeld zo:


  • Tegenwerping 1: Documenten kunnen kwijt raken tijdens de overstap
  • Oplossing 1: Voor de overstap wordt een volledige back-up met indexering gemaakt van alle documenten. Dan wordt alles overgezet naar Google Docs, maar het Microsoft Office-systeem blijft parallel bestaan. Pas als met de index is gecontroleerd dat alles succesvol is overgezet, wordt Google Docs in gebruik genomen.
  • Tegenwerping 2: De ICT-afdeling kan de piek in vragen net na de overstap niet aan omdat er te weinig mensen zijn op de helpdesk.
  • Oplossing 2: Van drie maanden voor tot negen maanden na de overstap worden er 5 extra helpdesk-medewerkers ingezet. Zij houden zich alleen bezig met vragen over de overstap van Microsoft Office naar Google Docs.


Tot slot: argumenteren tegen je voorstel is leuk en maakt het alleen maar sterker

Zet de volgende keer dat je een voorstel voorbereidt de bril van je publiek op en bedenk: zijn er ook reden om dit niet te willen? Met een pre-mortem-sessie kom je daar snel en op een leuke manier achter. Zo versterk je je voorstel en kun je het overtuigend brengen, ook als je publiek risico-avers is.


Stijn is directeur, adviseur en trainer van Analytic Storytelling. We helpen mensen om inhoudsgedreven verhalen te maken. Dat betekent: heldere en overtuigende communicatie over complexe inhoud.

Structureer voordat je schrijft: 3 voordelen van een bulletlist

Arnaud Bom


Schrijven is moeilijk, frustrerend en kost veel tijd. Je doet je best, maar krijgt lang niet altijd een logische tekst op papier. Terwijl je toch meer dan genoeg over je onderwerp weet. Herkenbaar? Door van tevoren een bulletlist te maken kun je je schrijfproces en –resultaat verbeteren.

Hoe begin je met schrijven? Veel mensen gaan kort voor de deadline achter hun computer zitten. Ze tikken een eerste zin, daarna nog één en nog één. En op een gegeven moment lopen ze vast. Eigenlijk is het best vreemd om zo te beginnen. Als je een huis gaat bouwen, maak je een ontwerp voordat je de eerste steen plaatst. Eerst denk je na, dan pas volgt de actie. Een bulletlist kan je helpen om op een vergelijkbare manier aan je tekst te werken.

Schrijven op basis van een bulletlist heeft drie grote voordelen:

  1. Het zorgt voor een structuur die je publiek begrijpt
  2. Het helpt om inhoudelijke en verhalende elementen te combineren
  3. Het verbetert je schrijfproces

Voordeel 1: Een bulletlist zorgt voor een structuur die je publiek begrijpt

De bulletlist maak je als je alle relevante informatie al hebt verzameld, bijvoorbeeld door te lezen, te brainstormen, te onderzoeken, et cetera. Grofweg kent je schrijfproces de volgende vier fases:


Met een bulletlist creëer je een apart moment om je verhaal te structureren. Dat maakt het makkelijker om je structuur te verbeteren. Als je direct begint met schrijven, is dit moeilijker omdat je dan tegelijk schrijft en structureert.

De structuur die je met je bulletlist maakt helpt je publiek vervolgens bij het lezen. Zonder duidelijke structuur vindt je publiek de weg niet in je verhaal. Het moet hard werken, haakt af of begrijpt je verkeerd. Hoe complexer je onderwerp, hoe belangrijker een structuur is. Ook wetenschappelijk onderzoek toont aan dat lezers teksten met een vooraf geschreven tekstplan beter en coherenter vinden.

Laten we als voorbeeld een beleidsverhaal nemen waarin je de directie van je ziekenhuis wil overtuigen om een zorgboulevard te openen. De bulletlist over de aanleiding van je voorstel kan er als volgt uitzien:


  • Steeds meer bedden in ons ziekenhuis staan leeg.
    • Steeds meer specialistische zorg vindt thuis plaats.
    • Patiënten kiezen voor een specialistische behandeling vaker voor een gespecialiseerd ziekenhuis en niet voor een klein ziekenhuis als het onze.
  • De verwachting is dat in ons ziekenhuis in 2020 25% van de bedden structureel onbezet is.
    • Dit is een landelijke trend.
    • De verwachting is gebaseerd op cijfers van het CBS en een onderzoeksbureau gespecialiseerd in zorgdata.
  • De kosten voor ons gebouw blijven gelijk, dus komen we hierdoor in financiële problemen.
    • Berekeningen laten voor 2020 een tekort zien van € 0,4 miljoen.
    • De verplaatsing van complexe zorg naar thuis gaat de laatste maanden sneller dan verwacht. Misschien zijn de berekeningen dus zelfs nog te optimistisch.

In vergelijking met volgeschreven alinea’s is het makkelijk om de hoofdstructuur te zien, zonder alle details. Materiaal toevoegen, verplaatsen of verwijderen is relatief eenvoudig. Het is psychisch makkelijker om een idee te schrappen, ook al ben je daaraan gehecht (‘kill your darlings’), als het een bullet is dan als het een alinea is. Is bijvoorbeeld echt relevant dat het om een landelijke trend gaat?

In de bulletlist kun je bijvoorbeeld ook overwegen om van het verwachte tekort de eerste hoofdbullet te maken en te kijken wat dat betekent voor de verhaalstructuur. Als je al tekst hebt, is het veel lastiger om andere clusteringen of een andere volgorde te overwegen.

Een extra voordeel van een bulletlist is dat je je verhaalstructuur in een vroeg stadium kunt bespreken. Zelf doe ik dat bijvoorbeeld met opdrachtgevers in verhaallijnsessies, met deelnemers in trainingen en met collega’s bij een artikel als dit.

Voordeel 2: Een bulletlist helpt om inhoudelijke en verhalende elementen te combineren

Als je over een complex onderwerp schrijft, wordt de tekst al snel abstract. De tekst over de zorgboulevard gaat dan bijvoorbeeld over ziekenhuisverplaatste zorg, gemiddelde ligduur, de eerste lijn, de business case en stakeholders. Om je tekst aansprekender én begrijpelijker te maken is het goed om voorbeelden toe te voegen.

Als je goed in je onderwerp zit, heb je vaak veel voorbeelden (en andere details) paraat die allemaal relevant lijken. Hoe plaats je die in je verhaal, zonder dat de tekst chaotisch wordt? Ook daar kan de bulletlist bij helpen.

In de voorbeeldbulletlist over de zorgboulevard onderbouwen de subbullets de hoofdbullets. In die subbullets kun je niet alleen argumenten geven, maar ook voorbeelden die de hoofdbullet verduidelijken. Verderop in het beleidsverhaal ziet dat er bijvoorbeeld zo uit:


  • De zorgboulevard verbetert de aansluiting tussen zorgaanbieders, waardoor de kwaliteit van zorg toeneemt.
    • [voorbeeld] Een patiënte komt bij de huisarts met spraakproblemen. De huisarts herkent een beroerte en verwijst haar naar de spoedeisende hulp. Ze moet daar zo snel mogelijk zijn om hersenbeschadiging te voorkomen. Als de praktijk zich op de zorgboulevard bevindt, is ze er in twee minuten.

Door een voorbeeld onder een hoofdbullet te plaatsen, weet je zeker dat het past in je argumentatieve lijn. Een bulletlist maakt het dus makkelijker om te beslissen welk voorbeeld je op welke plek opneemt.

Voordeel 3: Een bulletlist verbetert je schrijfproces

Schrijven is vooral zwaar omdat schrijvers vaak te veel dingen tegelijk doen. In de praktijk ziet het schrijfproces er dan zo uit:

Door tegelijk te structureren, te schrijven en te redigeren belast je jezelf cognitief te zwaar. Daardoor loop je vast of ga je taakontwijkend gedrag vertonen. Je gaat bijvoorbeeld literatuurverwijzingen maken terwijl je je had voorgenomen om te structureren.

Je werkt beter als je één ding tegelijk doet. Psychisch is een (schrijf)project minder zwaar als het uit afgebakende deelprojecten bestaat, zoals structureren. Daarom helpt een bulletlist volgens sommigen ook tegen een writersblock. Een bulletlist maken is een overzichtelijke taak na de onderzoeksfase, waar je zonder al te veel tegenzin aan kunt beginnen. Met een goede bulletlist wordt vervolgens ook schrijven overzichtelijk. Je hebt immers al veel werk van tevoren gedaan. Je weet al wat je gaat zeggen, je structuur is al logisch, dus je kunt je helemaal richten op de tekst. Soms krijg je daardoor het gevoel dat een tekst zichzelf schrijft.

De pomodoromethode is een praktische methode om te zorgen dat je één ding tegelijk doet is. Je zet een wekker op 25 minuten en bepaalt vooraf wat je in die tijd gaat doen, bijvoorbeeld structureren met een bulletlist. Als de wekker gaat, neem je een korte pauze. Dan bepaal je of je verder gaat met structureren of dat het tijd is om te gaan schrijven.

Met een bulletlist schrijf je dus makkelijker en sneller. De tijd die je investeert in een bulletlist verdien je met rente terug. Een schrijver die zegt dat hij door een deadline niet aan de bulletlist toekomt, doet dus een paradoxale uitspraak: ik heb geen tijd om efficiënt te schrijven. Dat is vergelijkbaar met een houthakker die te druk is om zijn bijl te slijpen.


Analytic Storytelling-tips in je inbox?

Stuur mij Analytic Storytelling-tips